Difference between revisions of "DsPic-Raspberry programmer interface"
| Line 94: | Line 94: | ||
</Config> | </Config> | ||
</pre> | </pre> | ||
| − | The pin | + | The pin number (pin="xx") corresponds to the GPIO pin number on the Raspberry Pi (see figure in [dsPIC 33F] section). |
The configuration example shown above is the one used to program the dsPIC of the World Pendulum Alliance. | The configuration example shown above is the one used to program the dsPIC of the World Pendulum Alliance. | ||
Once the configuration is set-up and the dsPIC is powered and connected to the Raspberry Pi, one can start loading the program (hexadecimal file) into the dsPIC memory. | Once the configuration is set-up and the dsPIC is powered and connected to the Raspberry Pi, one can start loading the program (hexadecimal file) into the dsPIC memory. | ||
| − | To correctly program the dsPIC, both the program memory and the | + | To correctly program the dsPIC, both the program memory and the config memory (special registers) must be programmed. Some devices also have an EEPROM memory. The config memory is programmed using the following command (in Linux): |
<pre> | <pre> | ||
sudo picpgm -p_cfg hexadecimalFile.hex | sudo picpgm -p_cfg hexadecimalFile.hex | ||
</pre> | </pre> | ||
| − | This will program the bit of the code corresponding to the "#pragma config" instructions. To load the program into the | + | This will program the bit of the code corresponding to the "#pragma config" instructions. To load the program into the program memory, use the following command (in Linux): |
<pre> | <pre> | ||
sudo picpgm -p_code hexadecimalFile.hex | sudo picpgm -p_code hexadecimalFile.hex | ||
</pre> | </pre> | ||
| + | This command will write and check (read) the dsPIC memory to make sure that it has be written properly. If writing errors occurred, rerun the command and make sure that no external electrical interference affects the dsPIC. For further option and usage of picgm, simply run: | ||
| + | <pre> | ||
| + | picpgm | ||
| + | </pre> | ||
| + | and help menu will appear. | ||
| − | + | and should be used with the following script: | |
| − | |||
<br>Bash file @ /etc/rc.local<br/> | <br>Bash file @ /etc/rc.local<br/> | ||
Revision as of 00:11, 20 November 2020
Contents
dsPic-Raspberry programmer interface
dsPIC 30F
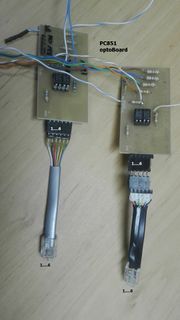
A general purpose interface consisting in two opto-couplers have been developed to program the dsPic micro-controllers directly from the Raspberry, allowing remote maintenance and reprogramming of each de-localized unit.
It as to be powered by 12 V (minimum voltage 10.5V - maximum voltage 13.5V) dsPic node unregulated Vcc and feed by the Raspberry GP_I/O, with a common digital ground.
Pin-out and connections
The following table describes the pin-out assembly of the opt-programmer developed to be used with picpgm software.
| Programmer pin-out | |||||
|---|---|---|---|---|---|
| Rasp I/O | Label | Programmer I/O | Picpgm function (invert) | Cable | |
| 39 | GND | GND | - | Blue/Wh | |
| 37 | BCM26 | PGD1//470 | DIN (0) | Brown | |
| 35 | BCM19 | PGD2//470 | DOUT (0) | Blue | |
| 33 | BCM13 | PGC | CLK (0) | Green | |
| 29 | BCM5 | RST (when high) | MCLR (1) | Brown/Wh | |
| 03 | BCM2 | PGMmode (high) | PGM (0) | Orange | |
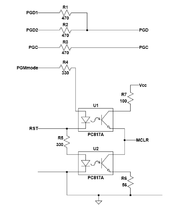
If RST low and PGMmode high the pic enter program mode (12V @ MCLR). If RST high (PGMmode any but should be low) the pic reset and hold. If PGMmode low and RST low the pic run with MCLR at high impedance (or pulled up from dsPicnode side.
PGD1 and PDG2 are summed with two 470 ohm resistors to the pic PGD PGC is connected to the pic PGC with one series resistor of 470 ohm.
The 12V pull-up is wired with a 100 Ohm resistor (version 1) and 470 ohm (original version). This is a non-essential situation as it was devised to create 4.3V if PGMmode and RST were independent.
The Picpgm column shows how to set the Picpgm configuration file in order to use this programmer with the GPIO's shown on the table. It also shows if the invert option should be selected for each of them.
dsPIC 33F
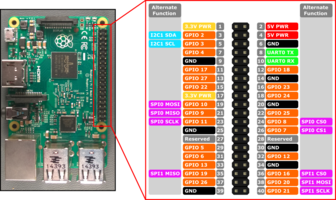
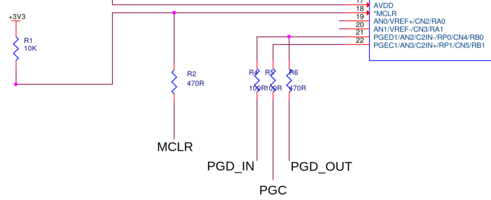
The dsPIC 33F family are programed with 3.3 V digital signals. Therefore, and unlike the dsPIC 30F, a 33F does not require any special hardware interface to be programed by the Raspberry Pi: a direct connection between the Raspberry Pi GPIO pins (see figure below) and the dsPIC programing pins (see schematic below) is the only requirement. Four pins are necessary: MCLR (reset), PGC (clock), PGD_out (write), PGD_in (read). The dsPIC should be powered for programming.

|

|
Software use
The dsPIC can be programed using the picpgm software which is hosted here.
Once downloaded and installed, edit the "pgmifcfg.xml" file to associate the Raspberry Pi GPIO pins with their function while taking into account the connection with the dsPIC pins.
As an example, the part of the "pgmifcfg.xml" file corresponding to the GPIO pins is shown below:
...
    </PgmIf>
    <PgmIf name="GPIO Programmer (Raspberry Pi)" typ="LVP" connection="GPIO">
        <PinCfg name="MCLR" pin="27" invert="0" />
        <PinCfg name="PGM" pin="22" invert="0" />
        <PinCfg name="CLK" pin="3" invert="0" />
        <PinCfg name="DOUT" pin="2" invert="0" />
        <PinCfg name="DIN" pin="4" invert="0" />
    </PgmIf>
</Config>
The pin number (pin="xx") corresponds to the GPIO pin number on the Raspberry Pi (see figure in [dsPIC 33F] section). The configuration example shown above is the one used to program the dsPIC of the World Pendulum Alliance.
Once the configuration is set-up and the dsPIC is powered and connected to the Raspberry Pi, one can start loading the program (hexadecimal file) into the dsPIC memory. To correctly program the dsPIC, both the program memory and the config memory (special registers) must be programmed. Some devices also have an EEPROM memory. The config memory is programmed using the following command (in Linux):
sudo picpgm -p_cfg hexadecimalFile.hex
This will program the bit of the code corresponding to the "#pragma config" instructions. To load the program into the program memory, use the following command (in Linux):
sudo picpgm -p_code hexadecimalFile.hex
This command will write and check (read) the dsPIC memory to make sure that it has be written properly. If writing errors occurred, rerun the command and make sure that no external electrical interference affects the dsPIC. For further option and usage of picgm, simply run:
picpgm
and help menu will appear.
and should be used with the following script:
Bash file @ /etc/rc.local
#The following lines should be added to file rc.local to allow the pic to run after RPI boot
#The wiringpi package needs to be installed
gpio -g mode 5 down
gpio -g mode 2 down
A backup is also founded at elab1/...

